Christmas Day Activities.
Handprint Reindeer

What You Need:
Light brown construction paper
Dark brown construction paper
Red pom pom
Pencil
Scissors
Glue
Wiggle eyes
Sock
Tape
What You Do:
Help your child trace her foot on a piece of dark brown construction paper.
Let her use scissors to carefully cut out the foot. This shape will be her reindeer's face.
Next, have her fold a sheet of light brown construction paper in half.
Help her trace on of her hands on the light brown construction paper.
With the paper still folded, have her cut out her traced hand from the paper. She should now have two hand shapes.
Let her tape the cut-out hands behind the reindeer head to create antlers.
Have her glue two wiggle eyes in place to give the reindeer goofy personality.The last touch is the "Rudolph red" nose! Help your child glue the red pom pom to the center of the reindeer's face.
Rudolph Craft

What You Need:
Mini terra cotta pot
Wiggle eyes
Red pom pom
Ribbon
2 brown pipe cleaners
Black marker
Glue gun
What You Do:
Have your child set his terra cotta pot upside down.
Let him glue a large red pom pom right in the center of the pot. This will be his reindeer's bright red nose.
Help him glue the wiggle eyes in place over the red pom pom nose.
Have him use a marker to draw goofy eyelashes above the wiggle eyes.
To make the antlers, help your child curve a brown pipe cleaner into a "U" shape.
Use the glue gun to attach the curved brown pipe cleaner onto the top of the terra cotta pot. The ends of the pipe cleaner should be pointing up.
Let him take another pipe cleaner and cut it in half.
Help him twist one of the short pipe cleaners around the ends of the first pipe cleaner, creating antlers.
Glue a looped ribbon to the top of the pot to create a handle for the ornament.
Let the entire craft dry over night.
In the morning, have your child hang his Rudolph ornament on your family's tree.
Father's Day Activities.
Bookmarks

Pictures of kids hanging (like off the monkey bars) or just standing with their hands over their heads, scissors, ribbon, laminator or contact paper, hole punchCut away the entire background of the pictures leaving only the cutout of the child.Run through the laminator or cover with contact paper. Cut off extra plastic. Punch a hole between the hands on the pictures and add a ribbon. A perfect gift for the avid reader in your life!
A Super Hero Father's Day Card.
You start with a double sided piece of scrapbook paper measuring 10 x 7. Then you fold both sides to meet in the middle. Next cut out a tie to add to the front.


You can use a Superman Cricut cartridge to cut out the Superman emblem and Mickey Mouse cartridge to cut out the letters.


Mather's day activities.
'You are my sunshine!'
At the top of the card it says “Mom, You are my sunshine!” which is perfect for Mother’s Day but you could use it for any occasion.
 Isn’t it cute?!
 You will need curly noodles, yellow paint, white cardstock paper, a black marker, glue, and a paintbrush.

 Start by squirting yellow paint on a plate and have the kids roll each noodle with a paintbrush.
 After the noodles dry, the kids will have to pick them off the plate because they’ll be sticking. Have them paint a yellow circle on the white folded paper and put lines of glue around the outside. Have them press the noodles against the glue and hold for a few seconds.
 Add a smiley face with a black sharpie and write “Mom, You are my sunshine!” at the top!
Flower Photo Magnet.
Supplies Needed:
- 2 - Cupcake Liners
- 1 - Tongue Depressor
- Green art foam sheet
- 1-1/2" square photo
- Water color paints or markers
- Elmer's glue
- Hot glue gun
- Paint brush
- Magnetic tape
To Assemble:Flatten one cupcake liner completely. Fill the inner circle with Elmer's glue. Place the second cupcake liner on the first.Using the hot glue gun, glue the cupcake liners to the top of the tongue depressor. Glue the child's photo in the center of the top cupcake liner. Glue the leaf shape onto the bottom of the tongue depressor.Measure a strip of magnetic tape to fit the back of the flower and you have a refrigerator magnet.
Directions:Decorate the cupcake liners with watercolor paint or markers. Paint the tongue depressor with the green tempera paint. Cut leaf shape from the green art foam sheet.

Halloween day activities.
Along came a spider treats.

Need a super-quick, super-easy Halloween treat? Here you go! These spider cookies come together in no time at all. Twist open the chocolate sandwich cookies, add some black lace licorice strands and white candy coating, close up the cookies, and add the eyes—that’s all it takes!
 Makes 12 cookiesBlack licorice laces (about 16 feet long)12 chocolate sandwich cookies1 cup white candy coating24 candy eyeballs1. Cut the licorice into 48 strips, each approximately 4 inches in length.2. Gently twist open the chocolate sandwich cookies.3. Place four licorice strips onto the side of the sandwich cookie with the filling, and press gently into the filling.4. Prepare the candy coating according to package directions. Working one cookie at a time, spoon approximately 1 to 2 teaspoons of the candy coating on top of the licorice strips and cookie filling. Place the top back on the sandwich cookie.5. With a spoon, place a small amount of candy coating on top of the sandwich cookies where the spider eyes will be placed. Immediately place two candy eyeballs onto the candy coating. Repeat with the remaining cookies. Allow to dry for at least 2 hours.
Carnival day activities.
Costume Party!
When you celebrate carnival, the best you can arrange with children is a costume party. You can choose a topic or each go of what they like.

Elephant stilts.

What you'll need:
- Two clean tin cans
- Colored paper
- Glue
- Paint and paintbrush
- Nylon stretch cord
- Knife
Directions:
1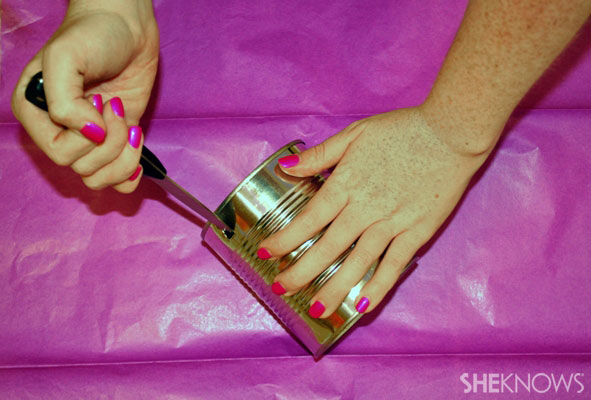 To start, make two holes in your tin cans, one on either side. We used 28-ounce cans, but the size of the can will depend on the child. Obviously, this step should only be completed by an adult — safety first!2
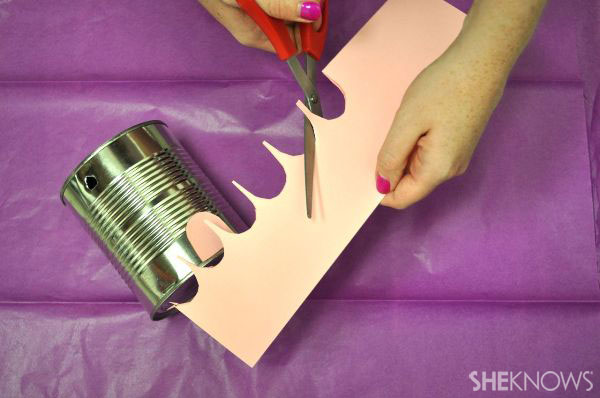 Decorate the cans! We used pink paper and black puffy paint to make the elephant toes, but let your creativity shine through. Paint, cut and color to your heart's content. We're envisioning an entire jungle of stilts.
 3
3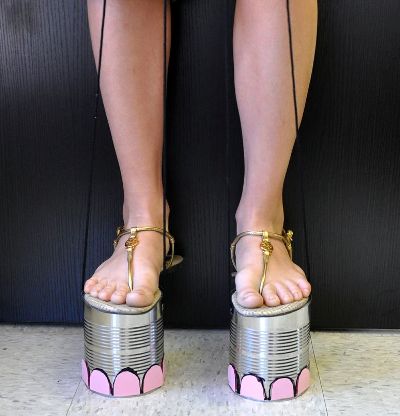 Cut your nylon stretch cord. If you don't have a stretch cord available, twine or heavy-duty string will also do the trick. The length of your cord will depend on your child's height, but a good starting point is 60 inches. Thread the cord through the holes in the can, knot the cord at the top and take it away!
Seasons activities
Season Tree.

Spring page
Summer page
Autumn page
Winter page
No comments:
Post a Comment